Write a test case
A test case is a name, a list of plain-English steps and an Expected Outcome that says what success looks like. You write it once on the Test Cases page. When you run it, Testmode opens your environment in a cloud browser, an AI agent carries out the steps, and the agent’s verdict becomes the result.
This page covers the test case dialog. For advice on wording, see Write effective steps and Expected Outcomes.
What goes into a test case?
Section titled “What goes into a test case?”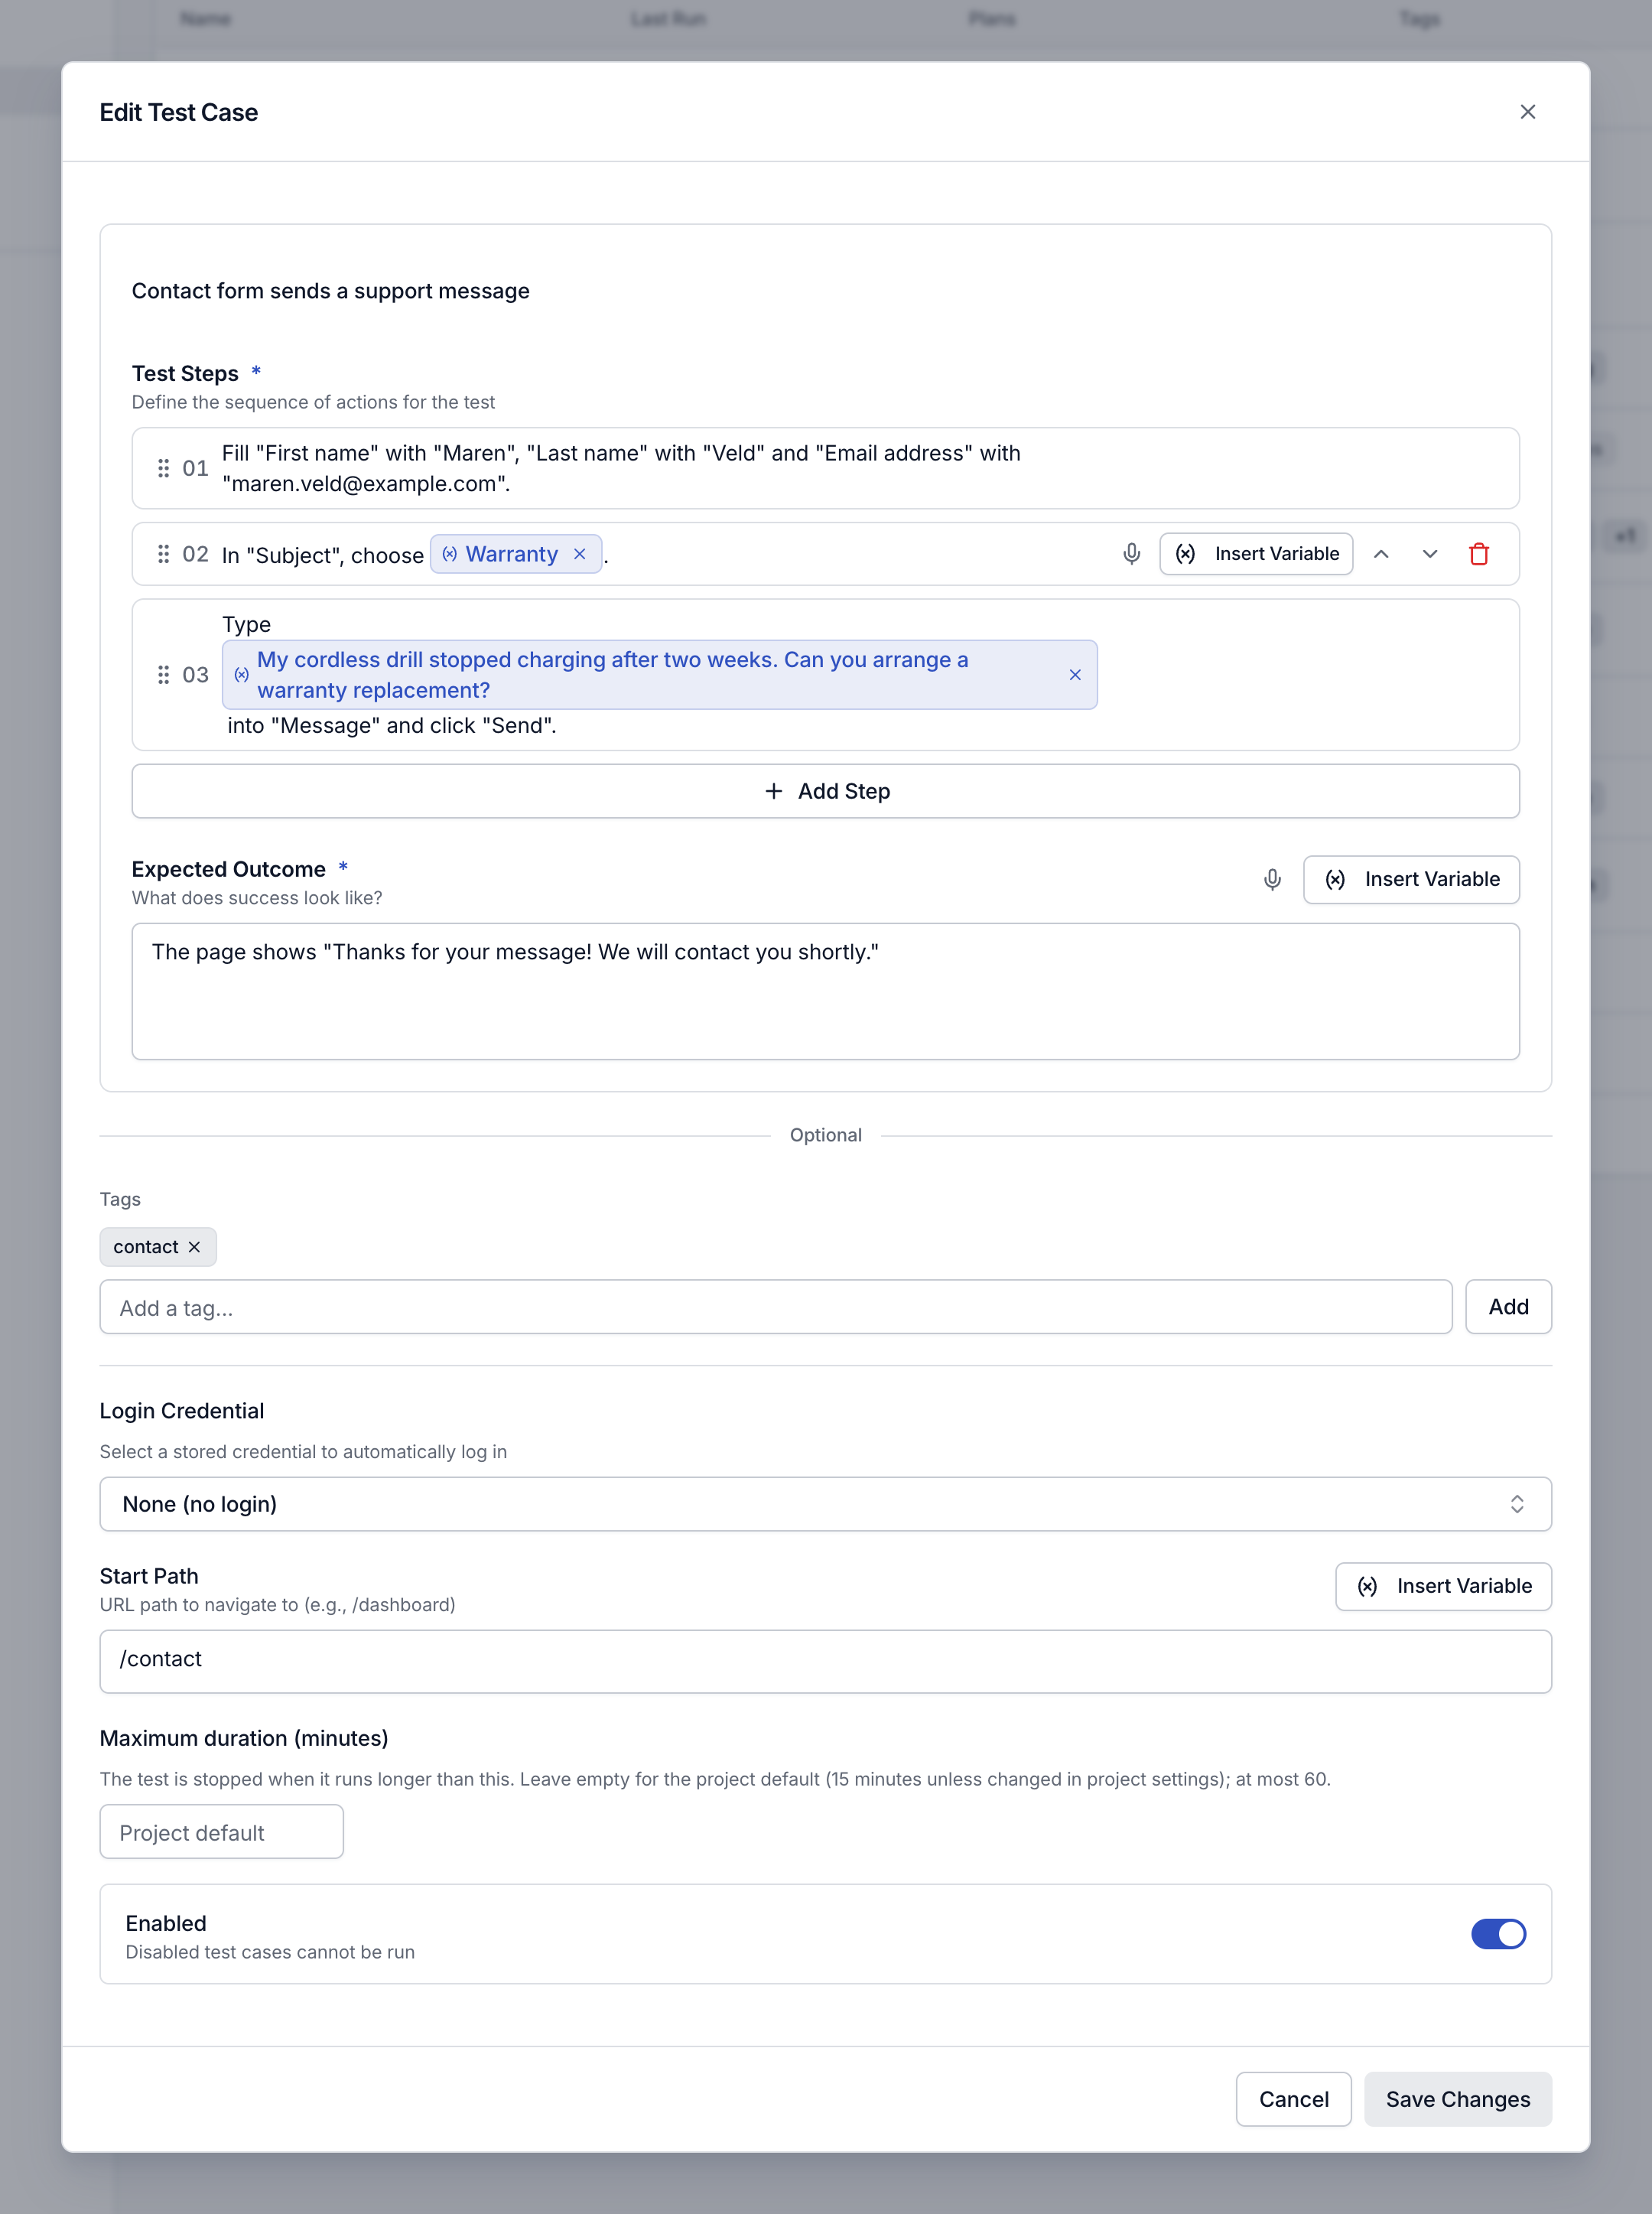
| Field | Required | What it does |
|---|---|---|
| Name | Yes | Identifies the test on the Test Cases page and on run pages. The agent reads it too, so keep it accurate. |
| Test Steps | Yes, at least one | The actions to take, in order, in plain English. |
| Expected Outcome | Yes | What must be true for the test to pass. |
| Tags | No | Labels for search, filters and grouping on the Test Cases page. |
| Login Credential | No | A stored login Testmode signs in with before the steps start. |
| Start Path | No | The page to open, relative to the environment’s Base URL, such as /contact. |
| Maximum duration (minutes) | No | How long the test may run before it is stopped. Empty uses the project’s default. |
| Enabled | No, on by default | Switch it off to keep the test but leave it out of runs. |
A test case has no environment of its own. You pick the environment each time you run it, so you can run the same test against staging and production.
Create a test case
Section titled “Create a test case”Before you start: you need the Editor role or above, and a project to add the test to.
-
Open Test Cases in the sidebar.
-
Click New Test Case, or press C.
The Create Test Case dialog opens with the cursor in the name field.
-
Type a name, for example
Contact form sends a support message. -
Add your steps under Test Steps. See Write steps below.
-
Describe success under Expected Outcome.
-
Optionally, fill in Tags, Login Credential, Start Path and Maximum duration (minutes), or switch Enabled off.
-
Click Create.
Testmode adds the test case to the end of the list and shows “Test case created”.
Create stays disabled until the test has a name, at least one step, text in every step, and an Expected Outcome, and until Maximum duration (minutes) is empty or a valid number. Until then the footer reads “Add a name, at least one step, and an expected outcome”.
A new test case is not in any plan yet. It shows Not in a plan in the list until you add it to a plan.
Write steps
Section titled “Write steps”Each step is one short instruction, such as: Type {{Support Message}} into “Message” and click “Send”. Here is the full Toolshop example from the screenshot:
1. Fill "First name" with "Maren", "Last name" with "Veld" and "Email address" with "maren.veld@example.com".2. In "Subject", choose {{Contact Subject}}.3. Type {{Support Message}} into "Message" and click "Send".- Click Add Step to add a step, then type the instruction. Pressing Enter inside a step starts a new line in the same step.
- Hover over a step to show its controls: a microphone for dictation (in supported browsers), Insert Variable, move up, move down and delete.
- To reorder, drag a step by its handle, or use the move up and move down buttons.
Good to know:
- The agent receives all steps together, with the name and the Expected Outcome, and decides how to carry them out. The actions on a run’s timeline are the agent’s own clicks and keystrokes, not a one-to-one copy of your steps.
- The placeholder text in an empty step suggests navigating to a login page and entering credentials. You rarely need either: use Start Path to begin on the right page and Login Credential to sign in.
- Deleting a step happens straight away, with no confirmation. Nothing is saved until you click Create or Save Changes, so Cancel discards it.
- To use a stored value, click Insert Variable and pick one. The step shows a chip with the variable’s current value, and Testmode swaps in the value when the test runs. See Variables.
Write the Expected Outcome
Section titled “Write the Expected Outcome”The Expected Outcome is the check. Describe what the page shows when the test has passed, in words the agent can compare with the screen:
The page shows "Thanks for your message! We will contact you shortly."The field has its own Insert Variable button and, in supported browsers, a microphone. Testmode marks the test Passed only when the agent reports that it passed. Anything else is Failed, with a failure reason on the run page. For wording that the agent can check, see Make the Expected Outcome observable.
Optional settings
Section titled “Optional settings”The fields below the Optional divider are tags, a login, a start page, a time limit and the enabled switch.
Type a tag in the Add a tag… box and press Enter or click Add. Testmode trims tags and saves them in lower case, so Contact becomes contact, and it ignores duplicates. Remove a tag with the × on its badge.
Login Credential
Section titled “Login Credential”Pick a stored credential to sign in before the steps start. The picker shows None (no login) until you choose one. Once you do, it shows the credential’s name, with “Will log in as” and the username underneath. Click the selected credential again, or choose None (no login), to clear it.
With a credential set, write your steps as if you are already signed in. The agent is told not to log in itself, so if it meets a login page, the test fails with “Session expired or login required”. A test plan can override the credential for one test case; see Test plans.
The picker lists every credential in the project, whatever its scope. The one you pick is used on whichever environment the run targets. See Credentials and automatic login.
Start Path
Section titled “Start Path”Enter the path of the page to open, such as /contact, not a full URL. Testmode joins it to the environment’s Base URL and opens that page before the agent starts on your steps. Leave it empty to start on the Base URL. The field accepts variables through its own Insert Variable button.
Maximum duration
Section titled “Maximum duration”Maximum duration (minutes) sets how long this test may run before Testmode stops it. Leave it empty, and the field shows “Project default”: the test then uses the project’s Default test duration (minutes) from Settings > General, or 15 minutes if that is empty too. Changing the project default needs the Editor role or above; see Create and manage projects.
- Enter a whole number from 1 to 60. Anything else shows “Enter a whole number between 1 and 60.” and keeps Create or Save Changes disabled.
- The time counts from when the start page opens, after any automatic login.
- A longer limit also lets the agent take more turns.
- Raise it for a long journey, for example
20for Checkout with cash on delivery, or lower it so a stuck test fails sooner.
A test that runs out of time is marked Failed with this reason:
Timed out: the test did not finish within 15 minutes (12 steps completed). Raise the test's maximum duration in its settings or split it into smaller tests.The step count in that message is the number of actions the agent recorded on the run’s timeline, not the number of your authored steps. Before raising the limit, check whether the test is too long to be one test; see Keep tests short and independent.
Enabled
Section titled “Enabled”On by default. Switch it off to keep a test case without running it: disabled test cases are left out of every run, including plan and scheduled runs, and don’t appear in the Run tests pickers. You can also flip the Enabled switch straight from the list.
Dictate instead of typing
Section titled “Dictate instead of typing”In browsers that support speech recognition, a microphone button appears on each step and next to Expected Outcome.
-
Click the microphone and speak.
The field shows “Listening…” and then your words as they are recognized.
-
Click the check mark to add the text to the end of the field, or the × to discard it.
Dictation uses US English. In browsers without speech recognition, the microphone does not appear. If the microphone is blocked, recording produces no text and shows no error.
Edit, duplicate or delete a test case
Section titled “Edit, duplicate or delete a test case”All three need the Editor role or above.
| Action | How | What happens |
|---|---|---|
| Edit | Click the row, or open the … menu and choose Edit | The Edit Test Case dialog opens. Click Save Changes to keep your edits. Cancel, the × or clicking outside discards them without asking. |
| Duplicate | … > Duplicate | Creates a copy with “(copy)” added to the name, at the end of the list, with the same steps, Expected Outcome, Start Path, credential, tags, maximum duration and enabled state. Plan memberships, schedules and run history are not copied. |
| Delete | … > Delete, then Delete in the Delete Test Case? dialog | Permanently deletes the test case and removes it from every plan. Past run results stay on the Runs page. |
Good to know:
- An edit also applies to a queued test of this case that has not started yet, because Testmode reads the steps and the maximum duration when the test starts. The credits for that run were already reserved when the run was created.
- Deleting cannot be undone. To stop a test from running but keep it, switch Enabled off instead.
- If a change is refused, Testmode shows an error such as “You don’t have permission to change this test case” instead of a success message.
View a test case as a Viewer
Section titled “View a test case as a Viewer”With the Viewer role, you can read test cases but not change them. The Test Cases page has no New Test Case button, and the row’s … menu shows View instead of Edit, with no Duplicate, Plans… or Delete.
Clicking a row, or choosing View, opens the dialog read-only, titled Test Case. Every field is locked, the footer reads “You need the Editor role or above to change test cases.”, and the footer has only a Close button. See Roles and permissions.
Related
Section titled “Related” testmode
Better software quality. No manual testing. Your team knows the software. Testmode does the testing.