Create and manage projects
A project holds everything Testmode needs to test one web app: its environments, credentials, variables, test cases, test plans, schedules, explorations and runs. You pick the current project in the project switcher at the top of the sidebar. Every page then shows that project.
In the examples on this page, the organization Pellbrook Digital tests the public Toolshop practice site in a project called Toolshop Storefront.
Switch projects
Section titled “Switch projects”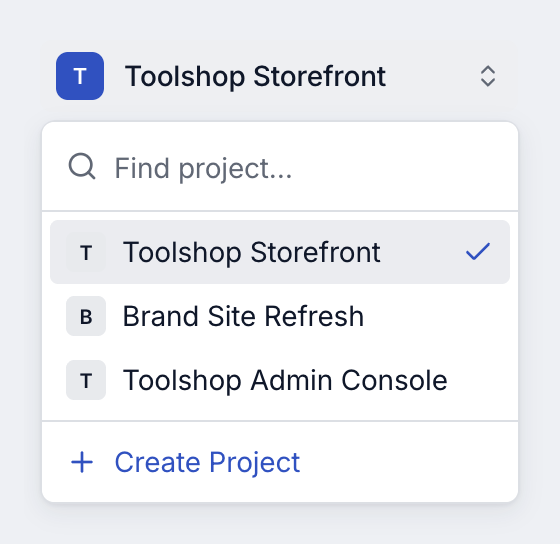
-
Click the project name at the top of the sidebar.
The switcher lists your organization’s projects, newest first. A check mark shows the current one. Projects with the same name are listed separately.
-
Optionally, type part of a name into Find project… to narrow the list.
-
Click a project.
The app switches every page to that project. Your browser remembers the choice, so you return to the same project next time.
If you switch while viewing a single run, test plan or exploration, Testmode takes you back to the Runs, Test Plans or Explore list, because that page belongs to the other project.
Search, filters and grouping on Test Cases, Test Plans and Runs are cleared when you switch, so the new project’s list starts unfiltered.
Create a project
Section titled “Create a project”Before you start: you need the Editor role or above in the organization. Viewers don’t see Create Project in the switcher.
-
Open the project switcher and click Create Project.
The Create new project dialog opens.
-
Enter a Project Name, for example
Toolshop Storefront. -
Optionally add an environment and a login in the same dialog (see the next section).
-
Click Create Project.
Testmode shows “Project created!”, makes the new project current and opens its Overview.
Project names do not have to be unique, so two projects can share a name. Pick names your team can tell apart.
Add an environment and login while creating
Section titled “Add an environment and login while creating”The Create new project dialog can set up the basics in one go. Tick either checkbox to reveal its fields.
| Checkbox | Fields | Example for the Toolshop |
|---|---|---|
| Add an environment | Name, Base URL, Production Environment switch | Production, https://practicesoftwaretesting.com, switched on |
| Add login credentials | Name, Username, Password, Login URL (optional) | Jane Doe – demo customer, customer@practicesoftwaretesting.com, the password, https://practicesoftwaretesting.com/auth/login |
A few things to know about this shortcut:
- The Base URL and Login URL must start with
http://orhttps://. - If you add both an environment and a login, the credential is scoped to that environment (Production only in the example) rather than Project-wide. Scope cannot be changed later, so add a login you want Project-wide under Settings > Credentials instead. See What Scope does.
- The dialog does not set a description or a default environment. Add those later under Settings.
Rename a project or change its description
Section titled “Rename a project or change its description”Before you start: you need the Editor role or above. Below that role, the fields are disabled and the card reads “You need the Editor role or above to change these settings.”
-
Make sure the project is current in the switcher, then click Settings in the sidebar.
-
On the General tab, under Project Details, edit the fields you want to change (see the table below).
-
Click Save Changes.
Testmode shows “Project settings saved”.
| Field | What it does | Toolshop example |
|---|---|---|
| Project Name | The name in the switcher and on every page. It cannot be blank. | Toolshop Storefront |
| Description | An optional note about the project. | Customer-facing Toolshop catalogue, cart, checkout and contact flows |
| Default test duration (minutes) | How long a test may run before Testmode stops it, for test cases that have no Maximum duration (minutes) of their own. Enter a whole number from 1 to 60. Leave it empty for 15 minutes. | (empty) |
A new default duration applies to tests that start after you save, including tests already queued. A test that runs out of time fails with a reason that starts “Timed out: the test did not finish within”. To give one long test more time without changing the default, set its own Maximum duration (minutes) instead. See Maximum duration.
If the duration isn’t a whole number from 1 to 60, the field shows “Enter a whole number between 1 and 60.” Clicking Save Changes then reports “Default test duration must be a whole number between 1 and 60 minutes” and saves nothing.
Delete a project
Section titled “Delete a project”Before you start: you need the Owner or Admin role. The Delete project card appears only for those roles.
-
Make sure the project is current, then open Settings > General.
-
Under Delete project, click Delete Project.
-
Check the project name in the confirmation dialog, then click Delete.
Testmode shows “Project deleted” and switches you to another project in the organization, if there is one.
Good to know
Section titled “Good to know”- A project belongs to one organization. You cannot move it to another organization.
- The project switcher only shows projects in the current organization. To see another organization’s projects, switch organizations first.
- New projects start empty. Nothing is copied from other projects.
Related
Section titled “Related” testmode
Better software quality. No manual testing. Your team knows the software. Testmode does the testing.