Search, filter, tag and enable test cases
The Test Cases page lists every test case in the current project, with its last result, its plans, its tags and whether it is enabled. You search, filter and group the list to find tests, add them to plans from a row, and switch a test off when you want to keep it but stop running it.
Read the list
Section titled “Read the list”Open Test Cases in the sidebar, or press G then T.
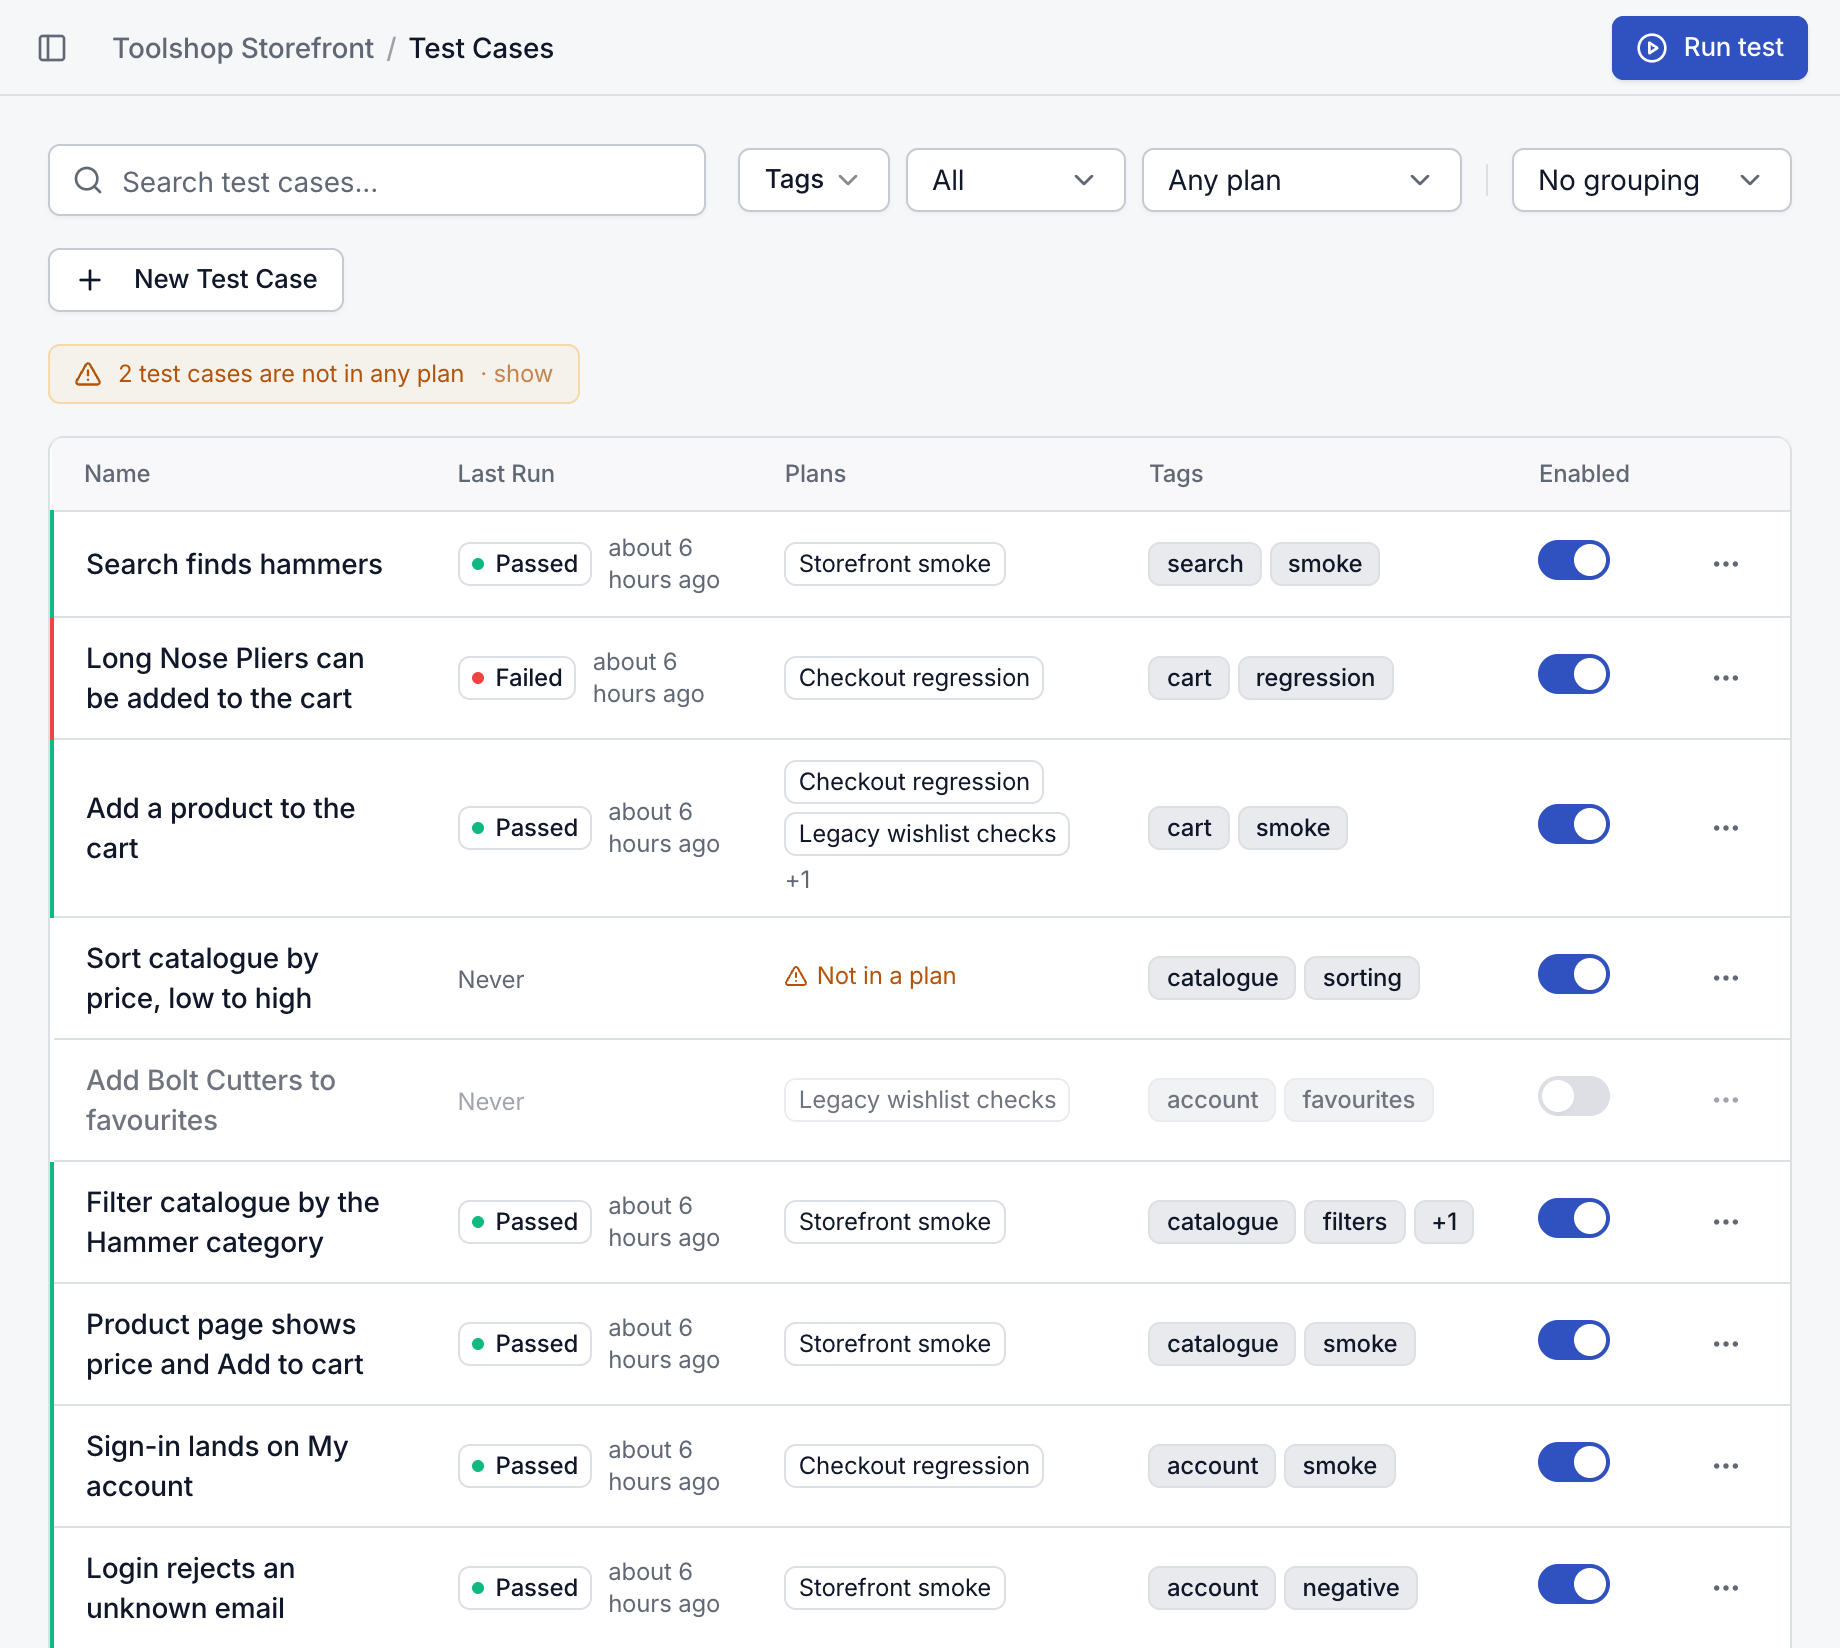
| Column | What it shows |
|---|---|
| Name | The test case name. Click anywhere on the row to open it. A test case with no steps and no Expected Outcome shows an amber No steps marker. |
| Last Run | The status of its most recent test execution, such as Passed or Failed, and how long ago it started. A test that has not started yet shows queued; a test case that has never run shows Never. |
| Plans | Up to two plan chips, each linking to the plan, and +N for the rest. A test case in no plan shows an amber Not in a plan button. |
| Tags | The first two tags, and +N for the rest. |
| Enabled | A switch. Disabled rows are dimmed. |
The … menu at the end of each row has Run, Edit, Duplicate, Plans… and Delete. Viewers see View instead of Edit, and no Duplicate, Plans… or Delete. They still see Run, but it does nothing for them, because starting runs needs the Editor role. Without grouping, the list shows 15 test cases per page, in the order they were created.
Test cases marked No steps
Section titled “Test cases marked No steps”A test case needs at least one step or an Expected Outcome to run. One that has neither shows No steps next to its name, with the tooltip “This test has no steps or expected outcome to check. Add at least one step.” Its … menu shows Run (add a step first), which you cannot click.
Such a test case is left out whenever it would otherwise run, including plan and scheduled runs, and it costs no credits. In the Run tests dialog, the Single test picker marks it “(no steps)”, and an amber notice explains that it will be skipped.
To fix it, open the test case, add at least one step and an Expected Outcome, and click Save Changes. The dialog does not save a test case without them.
Search
Section titled “Search”Type in Search test cases…, or press / to jump to the box. Search matches any part of a test case’s name or tags, ignoring case. Searching cart finds “Add a product to the cart” and every test tagged cart.
Search does not look inside steps or the Expected Outcome.
Filter by tags, status and plan
Section titled “Filter by tags, status and plan”The filters sit next to the search box and combine with it and with each other.
| Filter | Options |
|---|---|
| Tags | Tick one or more tags. With several ticked, only test cases that have all of them appear. smoke and cart together show “Add a product to the cart” but not “Search finds hammers”. |
| Status | All, Enabled or Disabled. |
| Plan | Any plan, Not in a plan, or a plan by name. Only plans that contain at least one test case are listed. |
Clear appears while a Tags, Status or Plan filter is active. It resets the filters and also turns grouping off.
Search, filters and grouping reset when you reload the page or switch project.
Group by tag or plan
Section titled “Group by tag or plan”Choose Group by Tag or Group by Plan in the grouping menu. No grouping returns to the flat list.
- Each group has a header with its name and a count. Click the header to collapse or expand it.
- Groups are sorted A to Z, with Untagged or Not in a plan last.
- A test case with several tags or plans appears in each of those groups.
- Grouped views show every matching test case on one page.
Group by Plan is a quick way to see which checks each plan covers, for example which tests “Storefront smoke” runs.
Find tests that are not in a plan
Section titled “Find tests that are not in a plan”A test case in no plan only runs when someone picks it by hand or runs all test cases. When the project has any, an amber button above the list says how many, ending in “not in any plan · show”. Click it to set the Plan filter to Not in a plan.
Add a test case to plans
Section titled “Add a test case to plans”You need the Editor role or above. For Viewers, the Not in a plan marker and the +N chip are plain text, not buttons.
-
Open the plans dialog in one of three ways: the row’s … menu > Plans…, the amber Not in a plan button, or the +N chip in the Plans column.
A dialog titled “Plans for” and the test case name opens. It lists every plan in the project with a checkbox, including disabled and empty plans.
-
Tick the plans this test case should run in, and untick any it should leave.
-
To create a plan on the spot, type a name under New plan, for example
Checkout regression. -
Click Save. It stays disabled until you change something.
Testmode confirms how many plans the test case is now in. If you typed a new plan name, it creates that plan, enabled, with the test case in it.
Unticking a plan removes the test case from it, along with any settings made for it in that plan, such as a credential override. Plans you leave ticked keep their settings. To manage a plan’s full list of tests, see Test plans.
Enable or disable a test case
Section titled “Enable or disable a test case”Flip the Enabled switch on the row. Testmode shows “Test case disabled” or “Test case enabled”. You can also change it in the test case dialog, where it takes effect when you save.
For Viewers, the switch is disabled, with the tooltip “You need the Editor role or above to change this”.
A disabled test case is kept, with its steps, tags and plan memberships, but it does not run:
- Plan runs and scheduled runs leave it out.
- All test cases in the Run tests dialog does not count or include it.
- It does not appear in the Single test picker.
Disabling is the safe way to pause a flaky or out-of-date test. Deleting is permanent.
Good to know:
- Choosing Run from a disabled test case’s … menu opens the Run tests dialog, but starting the run fails with “No enabled test cases to run”. Enable it first.
- Changing Enabled needs the Editor role or above. Viewers cannot start runs or edit tests from the app.
- If Testmode refuses a change, it shows an error such as “You don’t have permission to change this test case” instead of a confirmation.
Suggestions from Explore
Section titled “Suggestions from Explore”When an exploration has suggestions nobody has reviewed yet, a banner at the top of the page says how many test suggestions from the exploratory agent are waiting for review. The count includes proposals still To review and recommendations not yet marked reviewed.
Click the banner to open the most recent exploration with suggestions waiting. Nothing is added to your test cases until proposals are applied, either on the exploration page or by accepting them in the Assistant.
Related
Section titled “Related” testmode
Better software quality. No manual testing. Your team knows the software. Testmode does the testing.